Tunneling and Self-hosted Seafile
Table of Contents
Over the past few days, I’ve been messing around with moving some of my self-hosted services off of cloud providers, and onto my home infrastructure. While my home infrastructure may not be as reliable as the cloud providers, it’s nice to know my data is in my control. I’ve always been a uncomfortable just aiming DNS at my home IP, and poking holes in the firewall. This post details a couple of methods for hosting Seafile using Tunnels to better protect my home IP and the server.
- Cloudflare Tunnels
- VPS + Tailscale
Target Architecture #
The architecture I’m aiming at is something like this:
This has me excited for a few reasons:
- My home IP is not exposed through DNS, etc.
- I don’t have to open any inbound ports on my home firewall.
- I can rearrange / move internal infrastructure around and without breaking my public-facing content. (internal addressing doesn’t really matter)
Option #1: Cloudflare Tunnels #
The first option I’m evaluating is to use Cloudflare’s Tunnels.
Cloudflare offers Tunnels for free and they are extremely easy to setup.
The architecture here looks something like:
To set this up, we need to first create the tunnel with Cloudflare.
From the dashboard, click Zero Trust, and then Access > Tunnels.
Give the tunnel a name and click Create.

Cloudflare will give you some sample code to install/run the connector. We just need the Tunnel Token from one of these sample.
brew install cloudflare/cloudflare/cloudflared &&
sudo cloudflared service install mee3Iekahwaihoh0ud1ooCoow9xah7Seishei3leeheiquohg1
We just need the Tunnel Token (mee3Iekahwaihoh0ud1ooCoow9xah7Seishei3leeheiquohg1 above) for our configuration.
Next, we’ll setup our Seafile service on Docker.
My docker-compose.yml file:
version: "3.7"

services:

  # Cloudflare Tunnel Container
  tunnel:
    image: cloudflare/cloudflared
    command: tunnel --no-autoupdate run
    restart: unless-stopped
    environment:
      TUNNEL_TOKEN:  # from.env file
    depends_on:
      - seafile

  db:
    image: mariadb:10.5
    environment:
      MYSQL_ROOT_PASSWORD: ${DB_PASSWORD}  # Requested, set the root's password of MySQL service.
      MYSQL_LOG_CONSOLE: true
    volumes:
      - db:/var/lib/mysql  # Requested, specifies the path to MySQL data persistent store.

  memcached:
    image: memcached:1.6
    entrypoint: memcached -m 256

  seafile:
    image: seafileltd/seafile-mc:latest
    volumes:
      - data:/shared   # Requested, specifies the path to Seafile data persistent store.
    environment:
      DB_HOST: db
      DB_ROOT_PASSWD: ${DB_PASSWORD}
      TIME_ZONE: America/Edmonton  # Optional, default is UTC. Should be uncomment and set to your local time zone.
      SEAFILE_ADMIN_EMAIL:
      SEAFILE_ADMIN_PASSWORD:
      SEAFILE_SERVER_LETSENCRYPT: false   # Cloudflare is handling TLS
      SEAFILE_SERVER_HOSTNAME:
    depends_on:
      - db
      - memcached

volumes:
  db:
  data:
The various passwords and Tunnel Token are in the .env file:
TUNNEL_TOKEN=mee3Iekahwaihoh0ud1ooCoow9xah7Seishei3leeheiquohg1
SEAFILE_ADMIN_EMAIL=[email protected]
SEAFILE_ADMIN_PASSWORD=changeme
SEAFILE_SERVER_HOSTNAME=seafile.domain.com
DB_PASSWORD=changeme
We should be able to start up our containers with docker compose up.
Finally, we need to configure our Cloudflare tunnel to push traffic through to the right place.
We create two Public Hostnames (Seafile has two services we need to expose):
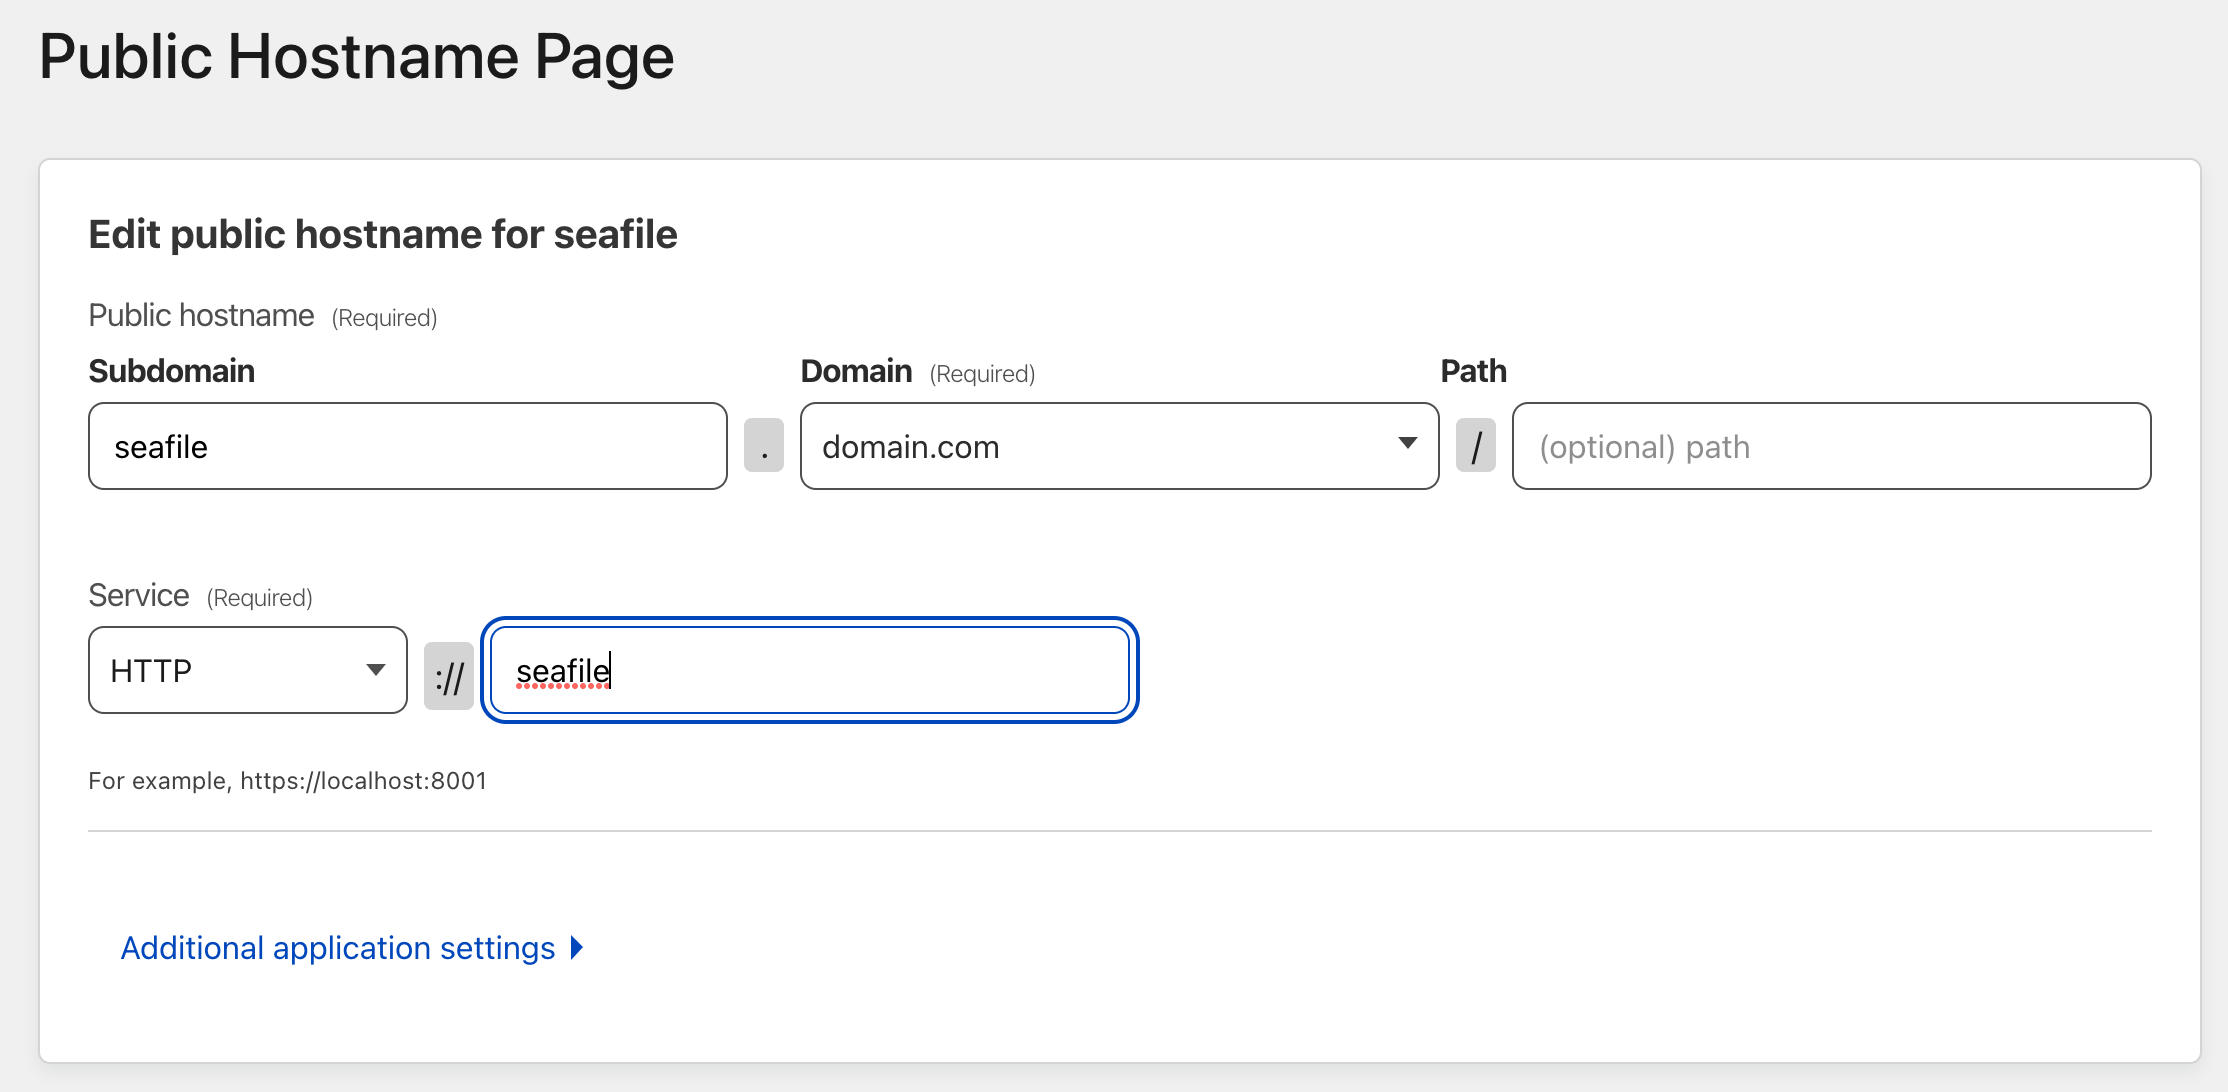
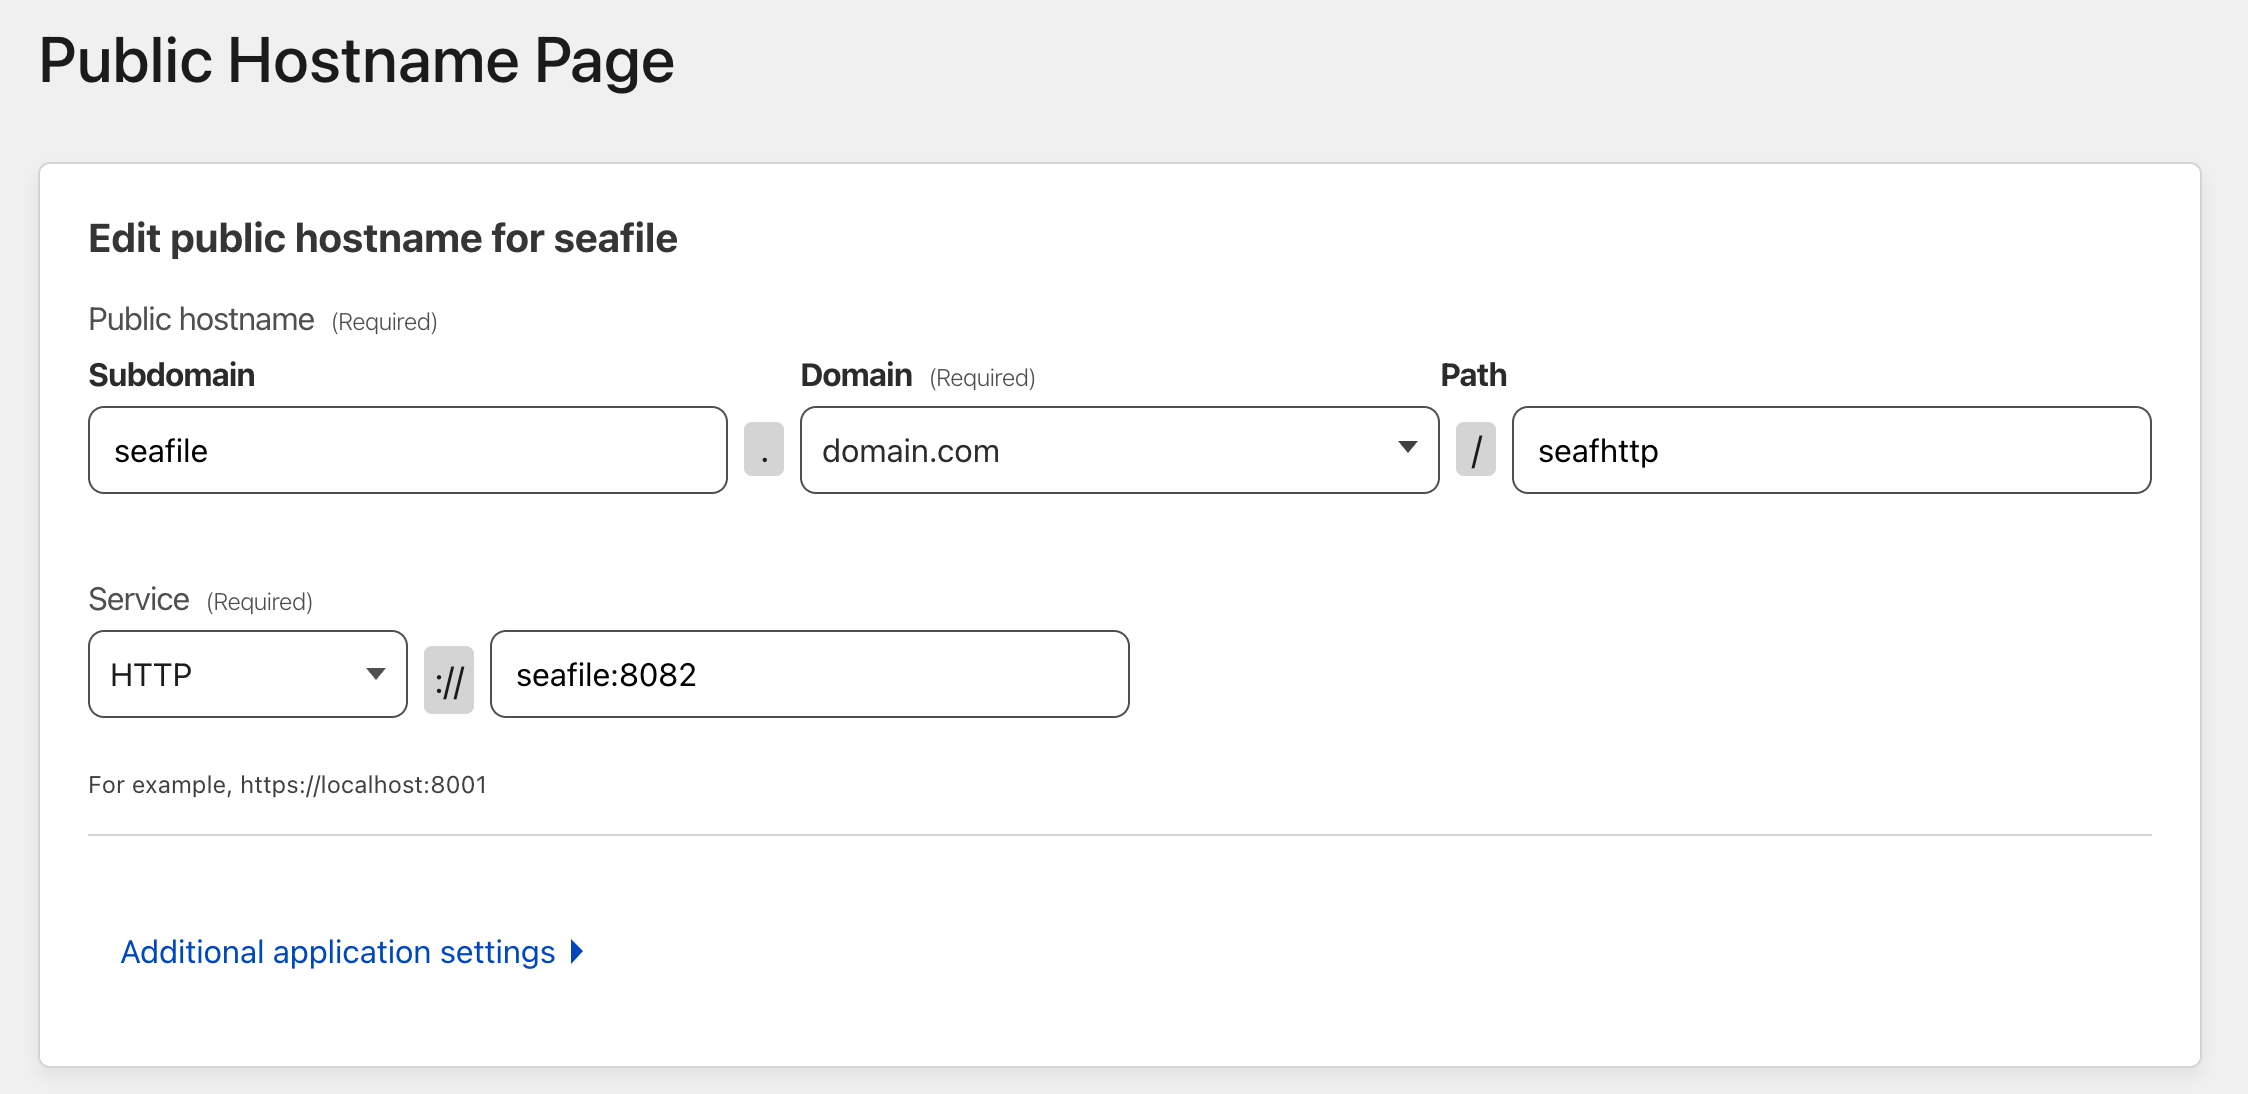
And with that, visiting https://seafile.domain.com should just work.
This is awesome because:
- Super easy to setup
- You can have multiple worker connected to a tunnel for load-balancing purposes
- Benefits from Cloudflare’s attack prevention
- Using Cloudflare Access Applications, you can easily stick additional authentication on top the service (further protecting the underlying service - doesn’t make sense for Seafile though)
However, a few things I dislike:
- While it’s free right now… I’m always cautious relying too much on free services like this.
- I need to hand the entire domain over to Cloudflare
I haven’t look exhaustively, but it looks like using Cloudflare tunnels requires the domain to be registered by/hosted with Cloudflare.
- I think Cloudflare is in the position to inspect the unencrypted traffic (i.e. TLS termination is on their end)
Option #2: VPS and Tailscale #
The other option I’ve considering is rolling my own with Tailscale and a VPS.
The architecture here looks something like:
It’s a bit more complex to setup, but has some nice properties that I’ll discuss later.
First, I’ll spin up a copy of Seafile in Docker (on a LAN server) and attach it to my Tailnet.
My docker-compose.yml file:
- This includes a Tailscale container that we’ll use to expose this service on our Tailnet.
- I’m using Caddy for Proxy & TLS
version: "3.7"

services:

  # Tailscale container
  tailscale:
    hostname: ${TAILNET_NAME}               # This will become the tailscale device name
    image: tailscale/tailscale
    volumes:
      - tailscale:/var/lib/tailscale        # State data will be stored in this directory
      - "/dev/net/tun:/dev/net/tun"         # Required for tailscale to work
    cap_add:                                # Required for tailscale to work
      - net_admin
      - sys_module
    command: tailscaled
    restart: unless-stopped

  # Caddy: Proxy + TLS
  caddy:
    image: caddy:alpine
    network_mode: service:tailscale
    volumes:
      - caddy_data:/data
      - ./Caddyfile:/etc/caddy/Caddyfile:ro
    depends_on:
      - tailscale
      - seafile-service
    restart: unless-stopped

  db:
    image: mariadb:10.5
    environment:
      MYSQL_ROOT_PASSWORD: ${DB_PASSWORD}  # Requested, set the root's password of MySQL service.
      MYSQL_LOG_CONSOLE: true
    volumes:
      - db:/var/lib/mysql  # Requested, specifies the path to MySQL data persistent store.
    restart: unless-stopped

  memcached:
    image: memcached:1.6
    entrypoint: memcached -m 256

  seafile-service:    # note: make sure this isn't the same as tailscale "hostname"
    image: seafileltd/seafile-mc:latest
    volumes:
      - data:/shared   # Requested, specifies the path to Seafile data persistent store.
    environment:
      DB_HOST: db
      DB_ROOT_PASSWD: ${DB_PASSWORD}  # Requested, the value shuold be root's password of MySQL service.
      TIME_ZONE: America/Edmonton  # Optional, default is UTC. Should be uncomment and set to your local time zone.
      SEAFILE_ADMIN_EMAIL: # Specifies Seafile admin user, default is '[email protected]'.
      SEAFILE_ADMIN_PASSWORD:     # Specifies Seafile admin password, default is 'asecret'.
      SEAFILE_SERVER_LETSENCRYPT: false   # Whether to use https or not.
      SEAFILE_SERVER_HOSTNAME:
    depends_on:
      - db
      - memcached
    restart: unless-stopped

volumes:
  db:
  data:
  tailscale:
  caddy_data:
And my Caddyfile in the same folder as docker-compose.yml
seafile.domain.com
tls [email protected]

reverse_proxy seafile-service:80
reverse_proxy /seafhttp seafile-service:8082
And my .env in the same folder as docker-compose.yml
SEAFILE_ADMIN_EMAIL=[email protected]
SEAFILE_ADMIN_PASSWORD=
SEAFILE_SERVER_HOSTNAME=seafile.domain.com
DB_PASSWORD=
TAILNET_NAME=seafile
We can start this up with docker compose up but it won’t work yet.
- We need to attach it to our Tailnet
- We need to setup our VPS to push
seafile.domain.comthrough to this machine
To attach to the Tailnet… (Turning off MagicDNS avoids some issues with container naming)
docker compose exec tailscale tailscale --accept-dns=false
Next we need to provision our VPS, install Docker, add our to our Tailnet, and configure the VPS to push traffic through to our Seafile container.
In my example, I would like to avoid having TLS Termination happen on the VPS (keeping my TLS certificates in-house), so I’ll using SNI Proxy on the VPS to redirect inbound traffic to the appropriate host on my Tailnet and leave it up to Caddy on my LAN side to deal with TLS certificates.
My docker-compose.yml file for SNI Proxy (on the VPS):
version: "3.7"

services:
  sniproxy:
    image: "tommylau/sniproxy"
    container_name: "sniproxy"
    restart: always
    hostname: "sniproxy"
    ports:
      - 80:80
      - 443:443
    volumes:
      - "./sniproxy.conf:/etc/sniproxy/sniproxy.conf:ro"
      - "./logs:/var/log/sniproxy"
And then, in the same folder as my docker-compose.yml file, my sniproxy.conf file.
user daemon
pidfile /var/run/sniproxy.pid

error_log {
    filename /var/log/sniproxy/error.log
    priority notice
}

listen 80 {
    proto http
    # fallback 127.0.0.1:9080
    table main

    access_log {
        filename /var/log/sniproxy/http_access.log
        priority notice
    }
}

listen 443 {
    proto tls
    # fallback 127.0.0.1:9443
    table main

    access_log {
        filename /var/log/sniproxy/https_access.log
        priority notice
    }
}

table main {
    seafile.domain.com seafile # or IP if not using MagicDNS
    # add additional services here!
}
After starting this up (docker compose up) you should now be able to hit https://seafile.domain.com.
Closing Thoughts #
The Cloudflare Tunnel is unbelievably slick, but my Tailscale setup is almost as easy and probably works better for me.
- No dependency on Cloudflare.
- Certificates / TLS termination happens on my computers
- I can modify my Tailnet to redirect
seafile.domain.comto the Tailscale machine directly and avoid bouncing through the VPS for machines on my Tailnet - I don’t have to move my domain to be hosted on Cloudflare.
The only downside of the DIY Tailscale approach that I’ve found so far is that, because the SNI Proxy is just blindly forwarding encrypted traffic, it doesn’t have an opportunity to add X-Forwarded-For type headers, so the IP address that Seafile sees is always the SNI Proxy Tailnet address.